一 、修改系统 配置文件
;----------------------------------------------------------------------------------
;uart configuration
;uart_debug_port  |Boot串口控制器编号        |
;uart_debug_tx       |Boot串口发送的GPIO配置|
;uart_debug_rx  |Boot串口接收的GPIO配置     |
;----------------------------------------------------------------------------------
[uart_para]
;uart_debug_port = 3
;uart_debug_tx   = port:PB6<7><1><default><default>
;uart_debug_rx   = port:PB7<7><1><default><default>

uart_debug_port = 2
uart_debug_tx   = port:PE2<3><1><default><default>
uart_debug_rx   = port:PE2<3><1><default><default>
把上面串口3的部分注释掉,添加串口2的配置信息, port:后面为硬件引脚,我这里原理图为PE2,PE3,后面的<3>为第几复用引脚。具体要查看T113-S3的芯片手册。
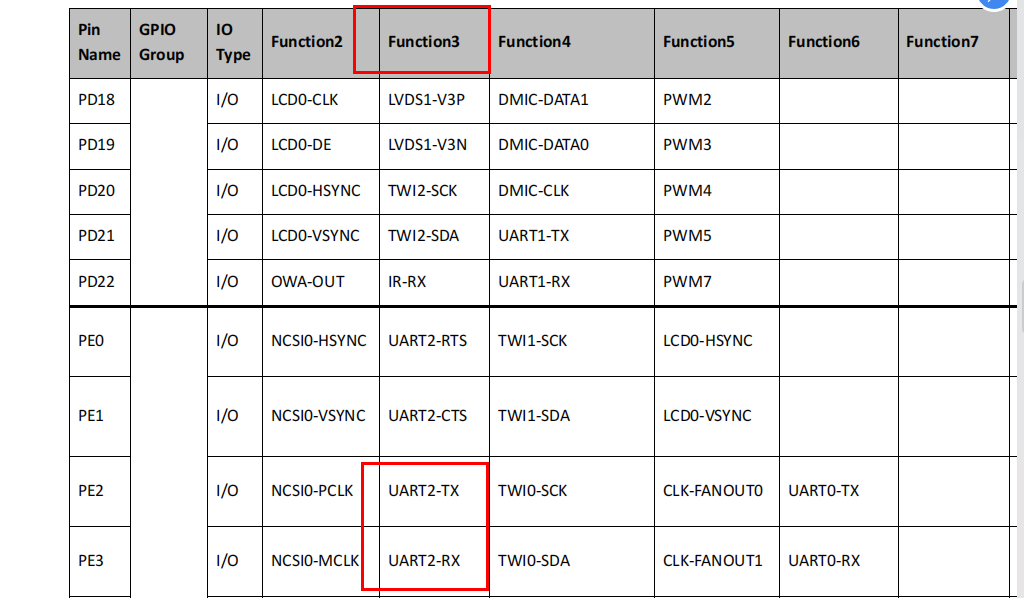
如上图所示,PE2,PE3复用UART2时是function3,所以后面就是<3>。
二 修改 Uboot的串口配置信息
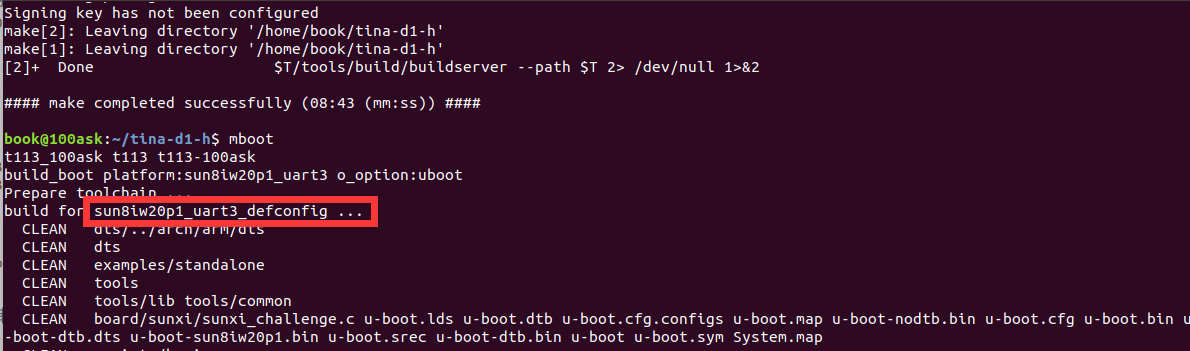
运行mboot命令会打印调试信息,可以 查看当前所使用的配置文件为sun8iw20p1_uart3_defconfig。
修改sun8iw20p1_uart3_defconfig文件,打开 SK目录下 /lichee/brandy-2.0/u-boot-2018/configs/sun8iw20p1_uart3_defconfig:
原来为:
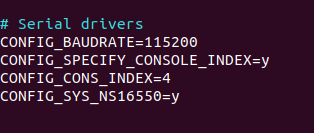
找到Serial drivers字段,把CONFIG_CONS_INDEX改为3 对应的是Uart2 其他串口安顺序。如果没有直接添加。
# Serial drivers
CONFIG_BAUDRATE=115200
CONFIG_SPECIFY_CONSOLE_INDEX=y
CONFIG_CONS_INDEX=3
CONFIG_SYS_NS16550=y
三 修改设备树文件
设备树文件位于SDK目录下/config/device/config/chips/t113/configs/100ask/board.dts
        uart2_pins_a: uart2_pins@0 {  /* For EVB1 board */
                pins = "PE2", "PE3";
                function = "uart2";
                drive-strength = <10>;
                bias-pull-up;
        };

        uart2_pins_b: uart2_pins@1 {  /* For EVB1 board */
                pins = "PE2", "PE3";
                function = "gpio_in";
        };
我们这里UART2正好对应PE2,PE3,所以不用修改,如果你们的不对应,请按芯片手册和原理图修改。
&uart2 {
        pinctrl-names = "default", "sleep";
        pinctrl-0 = <&uart2_pins_a>;
        pinctrl-1 = <&uart2_pins_b>;
        status = "disabled";
};
改为
&uart2 {
        pinctrl-names = "default", "sleep";
        pinctrl-0 = <&uart2_pins_a>;
        pinctrl-1 = <&uart2_pins_b>;
        status = "okay";
};
同时要检查PE2,PE3有没有在设备树中其他地方使用,有的话要关掉,这个非常重要。
四 uboot-board.dts
五 修改环境变量配置文件
#kernel command arguments
earlyprintk=sunxi-uart,0x02500C00
initcall_debug=0
console=ttyS3,115200
改为
#kernel command arguments
earlyprintk=sunxi-uart,0x02500800
initcall_debug=0
console=ttyS2,115200
0x2500800为UART2的寄存器首地址,ttyS2表示打印终端为串口2。
六 修改Linux内核配置文件
# CONFIG_DEBUG_SUNXI_UART0 is not set
# CONFIG_DEBUG_SUNXI_UART1 is not set
# CONFIG_DEBUG_SUNXI_UART2 is not set
# CONFIG_DEBUG_ICEDCC is not set
# CONFIG_DEBUG_SEMIHOSTING is not set
CONFIG_DEBUG_LL_UART_8250=y
# CONFIG_DEBUG_LL_UART_PL01X is not set
CONFIG_DEBUG_LL_INCLUDE="debug/8250.S"
CONFIG_DEBUG_UART_PHYS=0x02500C00
CONFIG_DEBUG_UART_VIRT=0xf2500C00
CONFIG_DEBUG_UART_8250_SHIFT=2
改为
# CONFIG_DEBUG_SUNXI_UART0 is not set
# CONFIG_DEBUG_SUNXI_UART1 is not set
CONFIG_DEBUG_SUNXI_UART2=y
# CONFIG_DEBUG_SUNXI_UART3 is not set
# CONFIG_DEBUG_ICEDCC is not set
# CONFIG_DEBUG_SEMIHOSTING is not set
CONFIG_DEBUG_LL_UART_8250=y
# CONFIG_DEBUG_LL_UART_PL01X is not set
CONFIG_DEBUG_LL_INCLUDE="debug/8250.S"
CONFIG_DEBUG_UART_PHYS=0x02500800
CONFIG_DEBUG_UART_VIRT=0xf2500800
CONFIG_DEBUG_UART_8250_SHIFT=2
添加了CONFIG_DEBUG_SUNXI_UART2=y,修改寄存器地址为2500800。
至此,全部完成,回到SDK目录下,make -jN 进行编译,N为处理器核数。 输入mboot命令编译UBOOT,最后pack命令进行打包即可。